Concert and low-light photography: settings that freeze the moment

Concerts, clubs, theatre and other dim indoor events are among the hardest places to take photos. The light is low, the performers move, and the stage lights change colour and brightness every few seconds. The good news is that a few fixed choices solve most of it: a lens that gathers a lot of light, a shutter fast enough to freeze motion, an ISO high enough to make that possible, and metering that reads the lit performer instead of the dark room. This guide covers each step, then adds a phone version and the courtesy that keeps you welcome at the next show.
Starting settings
| Setting | Start here | Section |
|---|---|---|
| Mode | Manual (M) or shutter priority (S/Tv) with auto ISO | 4 |
| Aperture | f/1.4–f/2.8, as wide as the lens allows | 2 |
| Shutter | 1/125–1/250 s | 3 |
| ISO | 1,600–6,400, higher if needed | 4 |
| Metering | Spot or highlight-weighted | 5 |
| White balance | About 3,200–4,000 K, or auto; shoot RAW | 6 |
| Shutter type | Silent / electronic, flash off | 7 |
1Check the venue's camera rules
Many venues and tours ban 'professional' cameras, which usually means interchangeable lenses or anything that looks large. Some allow only phones, some allow compact cameras, and a few allow anything. The rules are set by the venue, the promoter or the artist, and they can change from one show to the next.
Being turned away at the door, or asked to check your camera, is far worse than any missed shot, so find out before you leave home.
- Read the venue's website or ticket page for a 'bag and camera policy', and check the event page for artist-specific rules.
- If the rules are unclear, email or call the venue a few days ahead and keep the reply.
- Expect bans on detachable lenses, long lenses (often anything longer than about 2–3 in / 5–8 cm of barrel), tripods, monopods and video recording.
- If cameras are banned, plan a phone-only night rather than trying to sneak gear in.
2Use a fast prime lens
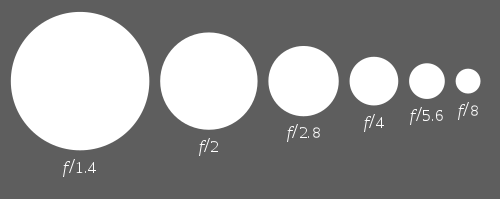
A fast lens is one with a very wide maximum aperture such as f/1.4, f/1.8 or f/2. Each full stop wider doubles the light reaching the sensor, so an f/1.8 lens gathers roughly four times more light than a typical zoom at f/3.5–f/4 (approximate). That extra light lets you keep a fast shutter without pushing ISO into extremes.
Primes (fixed focal length) are also small and cheap, which helps at venues that frown on big gear. A 35 mm or 50 mm prime is a good start; 85 mm reaches further from the crowd.
- Set the aperture to its widest value, or one-third to two-thirds of a stop narrower for a little extra sharpness.
- At f/1.4–f/2 the zone of sharp focus is thin, so focus on the performer's nearest eye.
- Use continuous autofocus (AF-C / AI Servo) with a single small focus point or face/eye detection.
- If you only own a kit zoom, use its widest end, where the aperture is widest, and step closer rather than zooming in.
3Freeze the performer with 1/125–1/250 s
Singers sway, guitarists swing their instruments and drummers move fast. A shutter speed of about 1/125 s freezes most singers and slow movement; 1/250 s handles jumping, dancing and hair flips. Slower speeds give blurred hands and faces, which rarely look intentional.
This rule of thumb is approximate. A slow ballad may allow 1/60–1/100 s, while a drummer's sticks may still blur at 1/500 s, which can look lively.

- Start at 1/200 s and adjust after checking a few frames zoomed in on the screen.
- Use shutter priority (S/Tv) with auto ISO, or manual mode with auto ISO, so the camera keeps your shutter speed and raises ISO as needed.
- Turn image stabilisation on; it reduces camera shake, though not the performer's movement.
- Shoot short bursts during peak moments, such as a jump or a guitar lift, and pick the sharpest frame later.
4Raise ISO and accept the noise
With the aperture wide open and the shutter fixed, ISO is the only setting left to bring the exposure up. In most venues that means ISO 1,600–6,400, and often more in small clubs. Noise (grain) rises with ISO, but a sharp, slightly grainy photo almost always beats a clean, blurred one.
Modern cameras handle high ISO well, and noise reduction software can clean up much of it afterwards. Underexposing to keep ISO low is a trap: brightening a dark file later adds even more noise.
- Set auto ISO with a maximum of about 6,400–12,800, depending on how your camera copes.
- Expose correctly in the camera rather than planning to brighten in editing.
- Shoot RAW for the best noise reduction and colour recovery.
- If noise still bothers you, convert the photo to black and white: grain looks natural there.
5Meter for the stage lights
Normal matrix or evaluative metering averages the whole frame. On a stage that means a large black background and a small lit face, so the camera brightens everything and the performer turns into a white, burnt-out shape. Spot metering reads only a small area, so you can measure the lit face directly. Highlight-weighted metering, found on some cameras, protects the brightest parts automatically.
Lights change constantly, so in manual mode you may still need to adjust by a stop or so between songs.
- Switch to spot metering and link the spot to your focus point if the camera allows it.
- Or use highlight-weighted metering, or matrix metering with about −1 to −2 stops of exposure compensation (approximate).
- Watch the histogram: the right edge should not pile up against the wall on faces.
- Turn on the highlight warning ('blinkies') and check that faces are not flashing.
6Handle coloured LED light and white balance
Stage LEDs produce strong, saturated colours, and the reds and blues are often so pure that only one colour channel of the sensor is recording. Red light is the worst: faces lose all detail, look smeared and out of focus, and the image looks blotchy. No white balance setting can fully fix light that contains only one colour.
Under mixed or white stage light, a white balance around 3,200–4,000 K is a reasonable starting point; under coloured light, the colour is part of the mood, so you often keep it rather than fight it.
- Shoot RAW so you can set white balance and reduce saturation in editing.
- Wait for moments when white or mixed light hits the performer; they often come at the start of a chorus or between songs.
- Under heavy red light, underexpose slightly to keep the red channel from clipping, or plan to convert to black and white.
- Do not trust the camera screen for colour; judge colour on a calibrated monitor later.
7Stay silent, skip the flash and respect the audience
Flash ruins the stage lighting you came to capture, distracts performers and is banned at most shows. Shutter noise matters at quiet events such as theatre, classical concerts or acoustic sets. The people around you paid for their view too.
- Turn off the flash and the autofocus assist lamp.
- Use the silent or electronic shutter at quiet events; watch for banding under LED light and switch back if stripes appear.
- Keep the camera close to your face, not held up high, and lower it between shots.
- Dim the screen, avoid long video clips and follow any 'first three songs only' rule if you have a photo pass.
8Concert photos with a phone
Phones struggle in the dark because of their small sensors, but they process images cleverly. The biggest problems are blur from the long exposures night modes choose, and blown-out faces under spotlights.
- Turn off night mode if it chooses long exposures; a sharp, darker photo is better than a blurred bright one.
- Tap the performer's face to focus, then drag the exposure slider down until the face is no longer white.
- Use the main (1x) or 2x lens rather than digital zoom; crop later if needed.
- Hold the phone with both hands, elbows tucked in, and shoot short bursts; keep the flash off and the screen dim.
Before the show
- Venue camera policy checked
- Fast prime fitted, aperture wide open
- Shutter 1/125–1/250 s
- Auto ISO with a sensible maximum
- Spot or highlight-weighted metering
- RAW on, white balance about 3,200–4,000 K
- Flash and AF lamp off, silent shutter for quiet events
- Charged battery and empty memory card