Food photography tips: light, angle and styling that make dishes look good

Food looks delicious in real life because of its texture, colour and smell. A photo can only show the first two, so light and angle do most of the work. You do not need a studio: a window, a plain surface and a few minutes of care beat any expensive camera under a ceiling lamp. This guide covers light, angle, styling, background, colour and phone settings, then adds how to frame for social media and how to shoot politely in a restaurant.
Quick setup
| Setting | Start here | Section |
|---|---|---|
| Light | Window to the side or slightly behind the plate | 1 |
| Angle | Overhead for flat dishes, about 45° for tall ones | 2 |
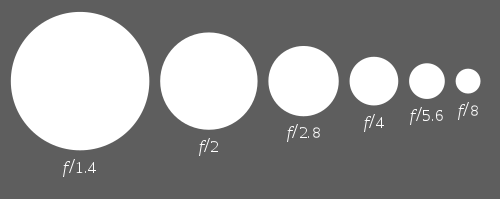
| Aperture | f/2.8–f/5.6 at 45°, f/5.6–f/8 overhead | 2 |
| White balance | Auto or daylight; correct in editing | 5 |
| Phone lens | 2x for less distortion | 6 |
| Exposure | Slightly bright, highlights not clipped | 6 |
| Frame | 4:5 vertical for feeds, 9:16 for stories | 7 |
1Use side window light, not overhead lamps
Light from the side shows texture: the crumb of bread, the gloss of a sauce, the grains of rice. Light from directly above, such as a ceiling lamp, flattens food, throws your own shadow onto the plate and often has a yellow or green cast. Soft daylight from a window, ideally out of direct sun, is the simplest good light there is.
Light from slightly behind the plate (backlight) makes drinks, soups and steam glow, while side light suits most solid dishes.
- Place the table so the window is to the left or right of the plate, or slightly behind it.
- Turn off ceiling lights and lamps so they do not mix with the daylight.
- Soften harsh sun with a sheer curtain or baking paper taped over the window.
- Fill dark shadows with a white card, napkin or menu held opposite the window.
2Choose the angle: overhead or 45°
The angle should match the shape of the food. Flat dishes such as pizza, salads, bowls and full table spreads look best from directly overhead, where patterns and arrangement show. Tall or layered food such as burgers, cakes, drinks and stacks look best from about 45° or lower, where you see their height and layers.
At 45° the background enters the frame, so keep it tidy. Overhead, the whole surface becomes the background.
- Ask: is the interesting part on top, or on the side? Top means overhead; side means 45° or eye level.
- For overhead shots, stand up or on a stable chair and keep the camera parallel to the table.
- At 45°, use a wider aperture such as f/2.8 to blur the background softly.
- Take both versions when unsure; it costs a few seconds.
3Style the plate
Small touches make a dish look fresh and cared for. Wipe drips from the rim, add a garnish that belongs to the recipe, and show a sign of use, such as a spoon or a torn piece of bread. Props should support the food, not compete with it.
Food changes fast: herbs wilt, cheese sets, ice melts and steam fades within a minute or two. Prepare the scene first, then bring in the food last.

- Set up props, light and camera with an empty plate, then swap in the hot dish.
- Use a few props in quiet colours: linen napkin, simple cutlery, a small bowl of an ingredient.
- Add a fresh garnish, a drizzle of oil or a sprinkle of salt right before shooting.
- Shoot steam against a dark background with backlight, and photograph immediately.
4Mind the background and negative space
A busy background, such as a patterned tablecloth, phone cables or other people's plates, pulls attention away from the dish. Plain wood, stone, linen or a matte board keep the focus on the food. Negative space, the empty area around the subject, gives the eye a place to rest and leaves room for text if the image is used online.
- Clear the table of anything that does not belong to the story.
- Use a matte surface; glossy tables reflect windows and lamps.
- Leave about a third of the frame empty on one side, and place the dish off centre using the rule of thirds.
- Choose background colours that contrast with the food: dark surfaces for light dishes, light surfaces for dark ones.
5Get the white balance right
Wrong colour is the quickest way to make food look unappetising. Tungsten lamps add orange, some LEDs add green, and shade adds blue. Our eyes adjust, but cameras do not always. Fresh food should look like itself: whites white, greens fresh, meat warm but not orange.
- Use one type of light only; turn off lamps when shooting by a window.
- Set white balance to auto or daylight by a window, and shoot RAW if possible.
- Put a white napkin or plate in the frame as a reference and correct to it in editing.
- Avoid heavy filters; a small warm shift is fine, strong colour casts are not.
6Phone tips: 2x lens, tap to focus, exposure slider
Phones make good food photos, but the wide main lens can distort plates and make close objects look stretched. Switching to the 2x (or 3x) lens and stepping back gives a more natural shape. Phones also tend to make food too dark or too bright, which the exposure slider fixes.
- Switch to the 2x lens and step back about a foot (30 cm) rather than shooting from very close with 1x.
- Tap the most important part of the dish to set focus there.
- Drag the exposure slider (the sun icon on many phones) up a little for bright, airy light, or down if highlights turn white.
- Turn off the flash, wipe the lens, and use portrait mode carefully: it can blur plate edges unnaturally.
7Compose for social media aspect ratios
Each platform crops differently. A 4:5 vertical frame fills the most space in most feeds, 1:1 suits grids, and 9:16 fits stories and short videos. A photo framed tightly in 3:2 may lose the garnish or the edge of the plate when cropped later.
- Decide where the photo will go before you shoot, and set the camera or phone to that ratio if possible.
- Otherwise, leave extra space on all sides so you can crop to 4:5, 1:1 or 9:16 later.
- Keep the main dish away from the very top and bottom of 9:16 frames, where buttons and captions appear.
- Check thumbnails: the dish should still be recognisable at a small size.
8Follow restaurant etiquette
Most restaurants welcome a quick photo, but long shoots, flash and moving furniture disturb other guests and staff. Some fine-dining places discourage photos altogether. The meal is the point; a photo should take seconds, not minutes.
- Ask staff if you plan anything beyond a quick shot, and respect a no.
- Never use flash, and do not stand on chairs or move other tables.
- Choose a window table when booking if photos matter to you.
- Shoot in under a minute, then eat while the food is still hot, and do not photograph other diners without permission.
Before you shoot
- Window light to the side, ceiling lamps off
- Angle chosen for the dish's shape
- Rim wiped, fresh garnish added
- Background cleared, negative space left
- White balance checked against something white
- Phone on 2x, focus tapped, exposure adjusted
- Frame set for 4:5, 1:1 or 9:16
- Flash off, quick and polite in restaurants