How to get off auto mode: a step-by-step plan

Auto mode is not bad; it simply makes every decision for you, so you cannot shape the photo. The quickest way to take control is not to jump straight to manual but to take over one control at a time. This plan spreads the steps over about five weeks: each week you learn what one mode decides for you, practise with a short exercise and only move on when it feels natural. Keep the camera's other settings simple while you learn.
Who decides what
| Mode | You set | Section |
|---|---|---|
| Auto (green) | Nothing; camera sets everything | 1 |
| P + exposure compensation | Brightness; camera sets aperture and shutter | 2 |
| A / Av (aperture priority) | Aperture; camera sets shutter | 3 |
| S / Tv (shutter priority) | Shutter speed; camera sets aperture | 4 |
| Auto ISO | A minimum shutter or both; camera sets ISO | 5 |
| M (manual) | Aperture, shutter and ISO | 6 |
1Know what auto decides for you
In full auto the camera picks aperture, shutter speed, ISO, often flash, focus area and white balance. It aims for an average, safe result: a picture that is evenly bright and not too blurry.
That is why auto photos often look fine but similar. The camera does not know you wanted a blurred background, a frozen splash or a dark, moody sunset.
- Before week 1, read the mode dial: Auto, P, A or Av, S or Tv, M.
- Turn off automatic flash so you see what the scene really looks like.
- Set image quality to RAW + JPEG if you can, so mistakes are easier to rescue while you learn.
- Keep a short note of each week's goal on your phone.
2Week 1: P mode with exposure compensation
Program mode (P) still chooses aperture and shutter speed, but it lets you change brightness with exposure compensation, the +/– control. This is the first real decision: how bright should this photo be?
The meter tries to make everything a medium grey, so snow and white walls come out too dark and dark scenes come out too bright. Compensation fixes that.
- Set the dial to P and find the +/– button or dial.
- Exercise: photograph something white (a page, a wall, snow) at 0, then +1 and +2. Compare on the screen and the histogram.
- Exercise: photograph something dark at 0, –1 and –2.
- Aim for one session of 30–50 frames this week, always asking whether the result needs + or –.
3Week 2: aperture priority (A or Av)
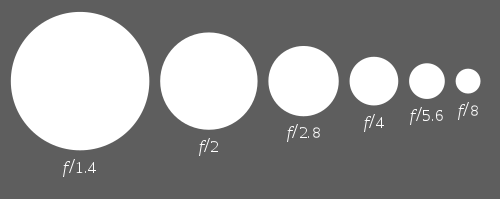
In aperture priority you choose the f-number and the camera chooses the shutter speed. Aperture controls how much is sharp in front of and behind your subject: a low number such as f/2.8 gives a blurred background, a high one such as f/11 keeps more in focus.
It is the mode many experienced photographers use most of the time, for portraits, landscapes and travel.
- Set the dial to A or Av and keep ISO fixed for now, for example ISO 200 outdoors.
- Exercise: place a subject about 6 ft from you with a background far behind it. Shoot at your lowest f-number, f/5.6 and f/11, then compare the background.
- Watch the shutter speed the camera chooses; if it falls below about 1/(focal length) seconds, as a rough rule, the photo may blur from shake.
- Keep using exposure compensation from week 1; it works the same here.
4Week 3: shutter priority (S or Tv)
In shutter priority you choose how long the shutter stays open and the camera chooses the aperture. Short times freeze movement; long times show it as blur.
This mode suits sport, children, pets, moving water and anything where motion matters more than depth of field.
- Set the dial to S or Tv.
- Exercise: photograph a fountain, tap or passing cars at 1/1000 s, 1/125 s and 1/15 s, with the camera braced or on a tripod for the slow one.
- Exercise: pan with a cyclist or car at about 1/30 s, following it smoothly, to get a sharp subject and streaked background.
- If the aperture value flashes, the camera has run out of aperture; choose a different shutter speed or change ISO.
5Week 4: Auto ISO
So far ISO has stayed fixed. Auto ISO lets the camera raise or lower it within limits you set, so you can keep your chosen aperture or shutter speed when light changes. Higher ISO brings more noise, so the limits matter.
Auto ISO pairs well with aperture priority and with manual mode, where it lets you fix both aperture and shutter.
- In the menu, turn on Auto ISO and set a maximum, for example ISO 6400 on a modern camera (adjust to your camera's noise level).
- Set a minimum shutter speed if your camera allows it, such as 1/125 s for people, or use the 'auto' option linked to focal length.
- Exercise: walk from bright outdoors into a shop or a dim room in A mode, and watch how the camera changes ISO.
- Check the photos at 100% on a computer to learn which ISO you find acceptable.
6Week 5: full manual (M)
In manual mode you set aperture, shutter speed and ISO yourself, and the exposure meter only advises. It is most useful when light is steady or when the camera would be fooled: night scenes, fireworks, studio flash, panoramas and backlit subjects.
Manual is not more professional by itself; it is a tool for situations where you want results to stay the same from frame to frame.
- Set M, choose the aperture you want, set ISO, then turn the shutter dial until the meter reads about 0.
- Exercise: photograph the same scene in A mode, note the settings, then copy them in M and change one value at a time by one stop.
- Exercise: on an evening walk, shoot a lit street in M and keep the settings fixed as you move; see how scenes of different brightness change.
- Try M with Auto ISO for fast-changing light, using exposure compensation if your camera supports it in that mode.
7When auto is fine
Moving off auto is about having a choice, not about never using it. Auto or a scene mode is a sensible pick when you need a quick photo and the light is ordinary, or when you hand the camera to someone else.
Many experienced photographers also use automation for focus, white balance and ISO, and save their attention for framing and timing.
- Use auto when a moment is happening now and you have no time to set up.
- Hand the camera to a friend in auto or P so they get a usable photo.
- Use auto white balance in most daylight scenes and correct later from RAW.
- Return to the mode that suits the scene as soon as you have a moment.
Your five-week plan
- Flash off and RAW + JPEG on
- Week 1: P mode and the +/– control
- Week 2: aperture priority, background blur test
- Week 3: shutter priority, freeze and blur test
- Week 4: Auto ISO with a maximum and a minimum shutter
- Week 5: manual, matched to the meter
- Review each session's photos and the histogram
- Go back a week if a step feels hard