Portrait photography: phone portrait mode and camera settings

A good portrait has three things in common, whatever made it: a flattering perspective, soft light on the face and a sharp eye. A blurred background helps, but it is the last ingredient, not the first. Phones fake that blur with software, cameras create it with optics, and both work best when you set up the scene well. This guide explains how portrait mode works and where it fails, then walks through distance, background, light, focus, posing and camera settings, and ends with adjusting the blur after the shot.
Starting settings
| Setting | Start here | Section |
|---|---|---|
| Phone lens | 2x or 3x, portrait mode on | 1 |
| Focal length (camera) | About 85 mm full-frame equivalent | 2 |
| Distance to subject | About 5–8 ft for head and shoulders | 2 |
| Subject to background | As far as possible, 10 ft or more | 3 |
| Aperture | f/1.8–f/4 | 7 |
| Focus | Single-point or eye AF on the nearer eye | 5 |
| Light | Window light or open shade | 4 |
1Understand how portrait mode fakes depth
A phone's sensor and lens are small, so they naturally keep almost everything sharp. Portrait mode works around this with software: it estimates how far away each part of the scene is, using two lenses, dual-pixel data, a depth sensor or machine learning, and builds a depth map. It then keeps the subject sharp and blurs the rest according to that map.
The map is a guess, and it is weakest at fine or see-through edges. Loose hair, glasses frames, earrings, fingers, cups and fences often get blurred by mistake or keep a sharp halo of background around them.
- Look at the edges after each shot, zoomed in: hair, ears, glasses and hands are the usual problem areas.
- Tie back stray hair or choose a plain, distant background so mistakes are less visible.
- Keep the subject inside the distance range the phone suggests; most phones show a message such as 'Move farther away' when the depth map cannot be built.
- For subjects with very complex edges, such as a veil or a bicycle, switch to the normal camera with the 2x or 3x lens and accept less blur.
2Choose a longer lens and the right distance
Perspective depends on how far you stand from the face. Standing very close with a wide lens makes the nose look bigger and the ears smaller. Stepping back and zooming in flattens the features in a more natural, flattering way.
On a camera, a focal length around 85 mm full-frame equivalent is the classic starting point for head-and-shoulder shots (about 50–55 mm on an APS-C camera). On a phone, use the 2x or 3x lens rather than the main 1x lens. These are rules of thumb; anything from roughly 50 to 135 mm equivalent works.
- Phone: select the 2x or 3x option in portrait mode before framing, instead of pinching to zoom on the 1x lens.
- Camera: use an 85 mm lens on full frame, a 50–56 mm lens on APS-C, or zoom a standard zoom to its long end.
- Stand about 5–8 ft away for head and shoulders and about 10–15 ft for a half-length shot (approximate).
- Keep the camera roughly at eye level; shooting from below enlarges the chin and nostrils.
3Put distance behind your subject
Background blur depends on how far the background is from the subject, not just on the aperture or the phone's blur slider. A person standing against a wall will have a sharp wall behind them on any camera. Move them a few steps forward and the same settings give a soft, smooth background.
This matters for phones too: a distant background is easier for the depth map to separate, so edge errors drop.
- Move the subject away from walls, hedges and fences; aim for 10 ft or more of empty space behind them if you can.
- Choose a background with calm colours and no bright spots or lines growing out of the head.
- Change your angle, not just your distance: step sideways or lower your position to put a distant tree line or street behind the subject.
- Check the background at the edges of the frame as carefully as the face.
4Find soft, flattering light
Light shapes a face more than any lens. Hard midday sun from overhead creates dark eye sockets, bright foreheads and squinting. Soft light from a large source wraps around the face, smooths skin and shows the eyes clearly.
Two easy sources of soft light are a large window with no direct sun coming through it and open shade, which is the shadow of a building or tree on a bright day, with the open sky in front of the subject.
- Indoors: place the subject a few feet from a large window, turned slightly toward it; the side away from the window can stay a little darker for shape.
- Outdoors at midday: move into open shade at the edge of a building or under a tree, with the subject facing the bright open area.
- Avoid patchy shade where spots of sun land on the face.
- Use a reflector, a white card, a sheet of foam board or even a light wall to bounce light back into the shadow side.
- Better still, shoot in the hour after sunrise or before sunset, when the sun is low and softer.
5Focus on the nearest eye
Viewers look at the eyes first. If the eyes are soft while the ear or the tip of the nose is sharp, the whole portrait feels out of focus. With a wide aperture the sharp zone is only a few inches deep, so focus has to land exactly on the eye.
A small reflection of the light source in the eye, called a catchlight, makes the face look alive. Window light and open shade usually create one naturally.
- Camera: turn on eye-detection autofocus, or use a single small AF point placed on the nearer eye.
- Use continuous AF (AF-C) if the subject is moving; one-shot AF (AF-S) if they are still and you will not recompose.
- Phone: tap the nearer eye on the screen before taking the shot.
- Zoom in on the first frame to confirm the eyelashes are sharp.
- If no catchlight appears, turn the face slightly toward the window or the open sky.
6Pose with simple, small changes
Most people feel awkward in front of a camera, and stiff poses show it. You do not need elaborate poses; a few small adjustments make almost anyone look more relaxed. Talking to the subject and giving clear, simple directions helps more than any setting.
- Turn the body about 30–45 degrees away from the camera, then turn the face back toward it.
- Ask the subject to shift weight onto the back foot and let the shoulders drop.
- Ask them to bring the forehead slightly forward and down toward the camera; it defines the jawline.
- Give hands a job: hold a cup, rest them on a rail or put one in a pocket.
- Shoot in bursts while talking, and catch the natural expression between poses.
7Set the camera: aperture, shutter and ISO
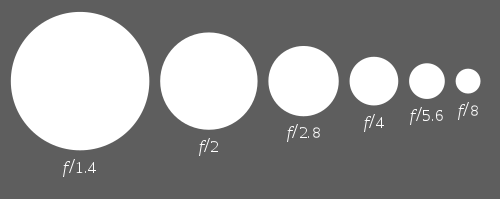
On a camera, a wide aperture blurs the background and lets in plenty of light. f/1.8 gives the strongest blur, but the sharp zone becomes very thin, and it is easy to get one eye sharp and the other soft. f/2.8–f/4 keeps the whole face sharp while still separating the background.
Aperture priority (A or Av) is the simplest mode: you choose the aperture, the camera chooses the shutter speed. Keep the shutter fast enough to freeze small movements.
- Start at f/2.8 for single portraits; open to f/1.8 for more blur, close to f/4–f/5.6 for two or more people at different distances.
- Keep the shutter at about 1/200 s or faster for a handheld portrait (approximate).
- Use Auto ISO with a maximum around 3200–6400 so the camera can keep the shutter fast in dim light.
- Shoot RAW if you plan to edit skin tones or exposure later.
8Edit the blur amount afterward
Most phones save the depth map with a portrait-mode photo, so you can change the blur strength, and sometimes the focus point, after the shot. Heavy blur looks impressive at first but makes edge errors more obvious; a gentle setting usually looks more like a real lens.
Camera photos have no depth map. Their blur is fixed by the optics, although some editing programs can now add or reduce blur with AI-based tools.
- Open the photo in the phone's gallery, choose Edit and look for an aperture (f) or depth slider.
- Try a value around f/2.8–f/4 on the slider; very low values like f/1.4 often show halos around hair.
- Move the focus point if the phone allows it, for example from the ear to the eye.
- If the edges still look wrong, remove the portrait effect entirely; the original image is kept.
- On a camera file, use AI lens blur tools only lightly and inspect edges at 100% zoom.
Before you shoot
- Phone on 2x or 3x in portrait mode, or about 85 mm equivalent on a camera
- About 5–8 ft from the subject for head and shoulders
- Subject well away from the background
- Soft light: window, open shade or low sun
- Reflector or white card for the shadow side
- Focus point or eye AF on the nearer eye
- f/2.8 to start, shutter about 1/200 s or faster
- Check hair and glasses edges, then adjust blur gently